
How to Delete Your Facebook Account or Deactivate Safely in 2026
· 20 min read

Why this guide matters: privacy, data, and choosing the right option
Thinking about leaving Facebook? You’re not alone. In 2026, many people are looking for ways to take more control over their online lives and protect their personal information. Learning how to delete your Facebook account is a big part of that.

It’s not just about stopping posts; it’s about managing your digital footprint and making choices that are right for you.
Before you jump into how to delete your Facebook account, it’s really important to know there are two main choices: deactivating your account or permanently deleting it. When you deactivate your Facebook account, it’s like putting it on pause. Your profile disappears from Facebook for a while, and people can’t search for you. But your information is still there, ready for you if you decide to come back. This can be a good choice if you just need a break or are not sure if you want to leave forever.
On the other hand, when you choose to permanently delete your Facebook account, it means you’re saying goodbye for good. All your posts, photos, and messages will eventually be removed from Facebook’s systems. This option is great for privacy, especially with new rules coming into play. For example, in 2026, privacy laws like California’s Delete Act are making it easier for people to ask for their personal data to be removed by data brokers and social media companies [^1] [^2]. It gives you more power over your information online.
This guide will walk you through exactly how to delete your Facebook account or how to disable your Facebook account, step by simple step. We’ll show you what to do on both your computer and phone. We’ll also cover important things to think about, like what happens to your Facebook business page, if you have one, or other apps that use your Facebook login. Plus, we’ll explain how to download all your important data before it’s gone. We know it can feel a bit tricky, but don’t worry, we’re here to help you get it right.
[^1]: U.S. Data Privacy Laws and Regulations in 2026 – Smarsh
[^2]: Californians block personal data from hundreds of brokers at once
Deactivate vs Delete: Which Option Is Right for You?
When you decide to step away from Facebook, you have two main paths: you can deactivate your account or you can permanently delete your account. Knowing the difference between these two is super important, as each has its own outcomes.
Let’s look closely at both so you can pick the best choice for you.
Deactivating Your Facebook Account
Think of deactivating as putting your Facebook account on pause. It’s a temporary break. When you choose to deactivate your Facebook account, your profile disappears from Facebook. People can’t search for you, and your friends won’t see you in their friend lists. Your old posts and photos usually become hidden.
Why choose to deactivate?
- You need a break: Maybe you just want to take a short vacation from social media.
- You’re not sure: You might be thinking about leaving for good, but you want to keep the door open.
- Keep Messenger: Often, you can still use Facebook Messenger to chat with friends even when your main Facebook account is deactivated.
- Easy to come back: If you change your mind, you can just log back in, and your profile and all your information will be restored. It’s like you never left.
Permanently Deleting Your Facebook Account
When you choose to permanently delete your Facebook account, you’re telling Facebook you want to remove your information for good. This is a much more serious step. Once you confirm you want to delete your account, Facebook gives you a short grace period (usually around 30 days). If you don’t log back in during this time, your account is marked for permanent deletion.
Why choose to delete?
- Privacy reasons: Many people choose to delete for better online privacy. New rules like the California Delete Act in 2026 are making it easier for people to get their personal data removed by online companies, which empowers you to truly take control of your digital footprint [^1] [^2].
- Digital detox: You want a complete break from Facebook and its services.
- You won’t come back: You’ve decided you’re done with Facebook for good.
- Remove all data: This action aims to remove all your posts, photos, messages, and other data from Facebook’s servers over time.
What Happens to Other Facebook Features?
It’s important to know how each choice affects other things linked to your Facebook account.
- Facebook Messenger: If you deactivate your account, you can often keep using Messenger. But if you permanently delete your account, you will lose access to Messenger too.
- Facebook Pages: If you manage a Facebook business page or other pages, deleting your personal account might mean you lose control of these pages. You should make another admin for the page before you delete your account, or delete Facebook page specifically if you no longer need it. If you’re wondering how to delete Facebook business page, it’s a separate step from deleting your personal profile.
- Groups: Your posts in groups usually stay there after deactivation or deletion, but your name might appear as "Facebook User" for deleted accounts.
- Third-party logins: Many apps and websites let you log in using your Facebook account. If you delete your Facebook account, you will lose access to these apps and will need to create new logins or link them differently.
Deciding how to delete Facebook account or how to disable Facebook account depends on what you want. Think about how long you want to be away and how important full data removal is to you.

How to deactivate your Facebook account — step-by-step (desktop & mobile)
If you’ve decided to take a break from Facebook, deactivating your account is the way to go. It’s like putting your profile on hold. Here’s how to disable your Facebook account easily in 2026, whether you’re using a computer or your phone.

On a Desktop Computer
Following these steps will help you put your Facebook account on pause from your PC or laptop:
- Log In: Go to Facebook.com and log into your account.
- Go to Settings: Click on your profile picture or the small arrow in the top right corner of the screen. From the menu that pops up, choose "Settings & privacy", then click "Settings".
- Find Your Account Information: On the left side of the screen, look for "Privacy" or "Your Facebook Information." Click on "Privacy", then "Your Facebook Information" if it appears as a sub-option.
- Choose Deactivation: You’ll see an option called "Deactivation and deletion". Click on this.
- Confirm Deactivation: Select "Deactivate account" (not "Delete account," which is a permanent step) and then click "Continue to account deactivation".
- Follow Prompts: Facebook will ask you to confirm your password and give a reason for leaving. Complete these steps and then click "Deactivate" to finish.
For a visual guide, you can watch a video on how to deactivate your Facebook account in 2026 [^13].
On a Mobile Device (iPhone or Android)
The steps are very similar whether you have an iPhone or an Android phone:
- Open the App: Open the Facebook app on your phone.
- Go to Menu: Tap the menu icon, which often looks like three lines or your profile picture, usually in the bottom right (for iOS) or top right (for Android).
- Access Settings: Scroll down and tap on "Settings & privacy", then tap "Settings".
- Find Account Center: Look for "Account Center" at the very top. If you see it, tap there. If not, scroll further down in "Settings" to find "Personal details" under "Account".
- Choose Account Ownership: In Account Center, tap "Personal details", then "Account ownership and control". Or, if you’re not in Account Center, look for "Deactivation and deletion" directly under "Your Facebook Information".
- Select Deactivation: Tap "Deactivation and deletion". Choose your Facebook profile if you have more than one, and then select "Deactivate account".
- Complete Steps: Follow the on-screen instructions, enter your password, and choose a reason. Then, confirm your choice to deactivate.
What Happens After You Deactivate?
Once you deactivate, your Facebook profile will disappear right away. People won’t be able to search for you, and your posts and photos will be hidden. The good news is that you can often still use Facebook Messenger to chat with friends [^15].
If you ever want to come back, it’s easy! Just log back into Facebook with your usual email and password. All your information will be there, just as you left it. You don’t have to worry about how to delete Facebook account if you just want a temporary break. Remember, deactivating is different from learning how to delete Facebook business page, which is a separate process for business profiles.
Deciding to permanently leave Facebook is a bigger step than just taking a break. When you delete your account, it’s gone for good after a waiting period.
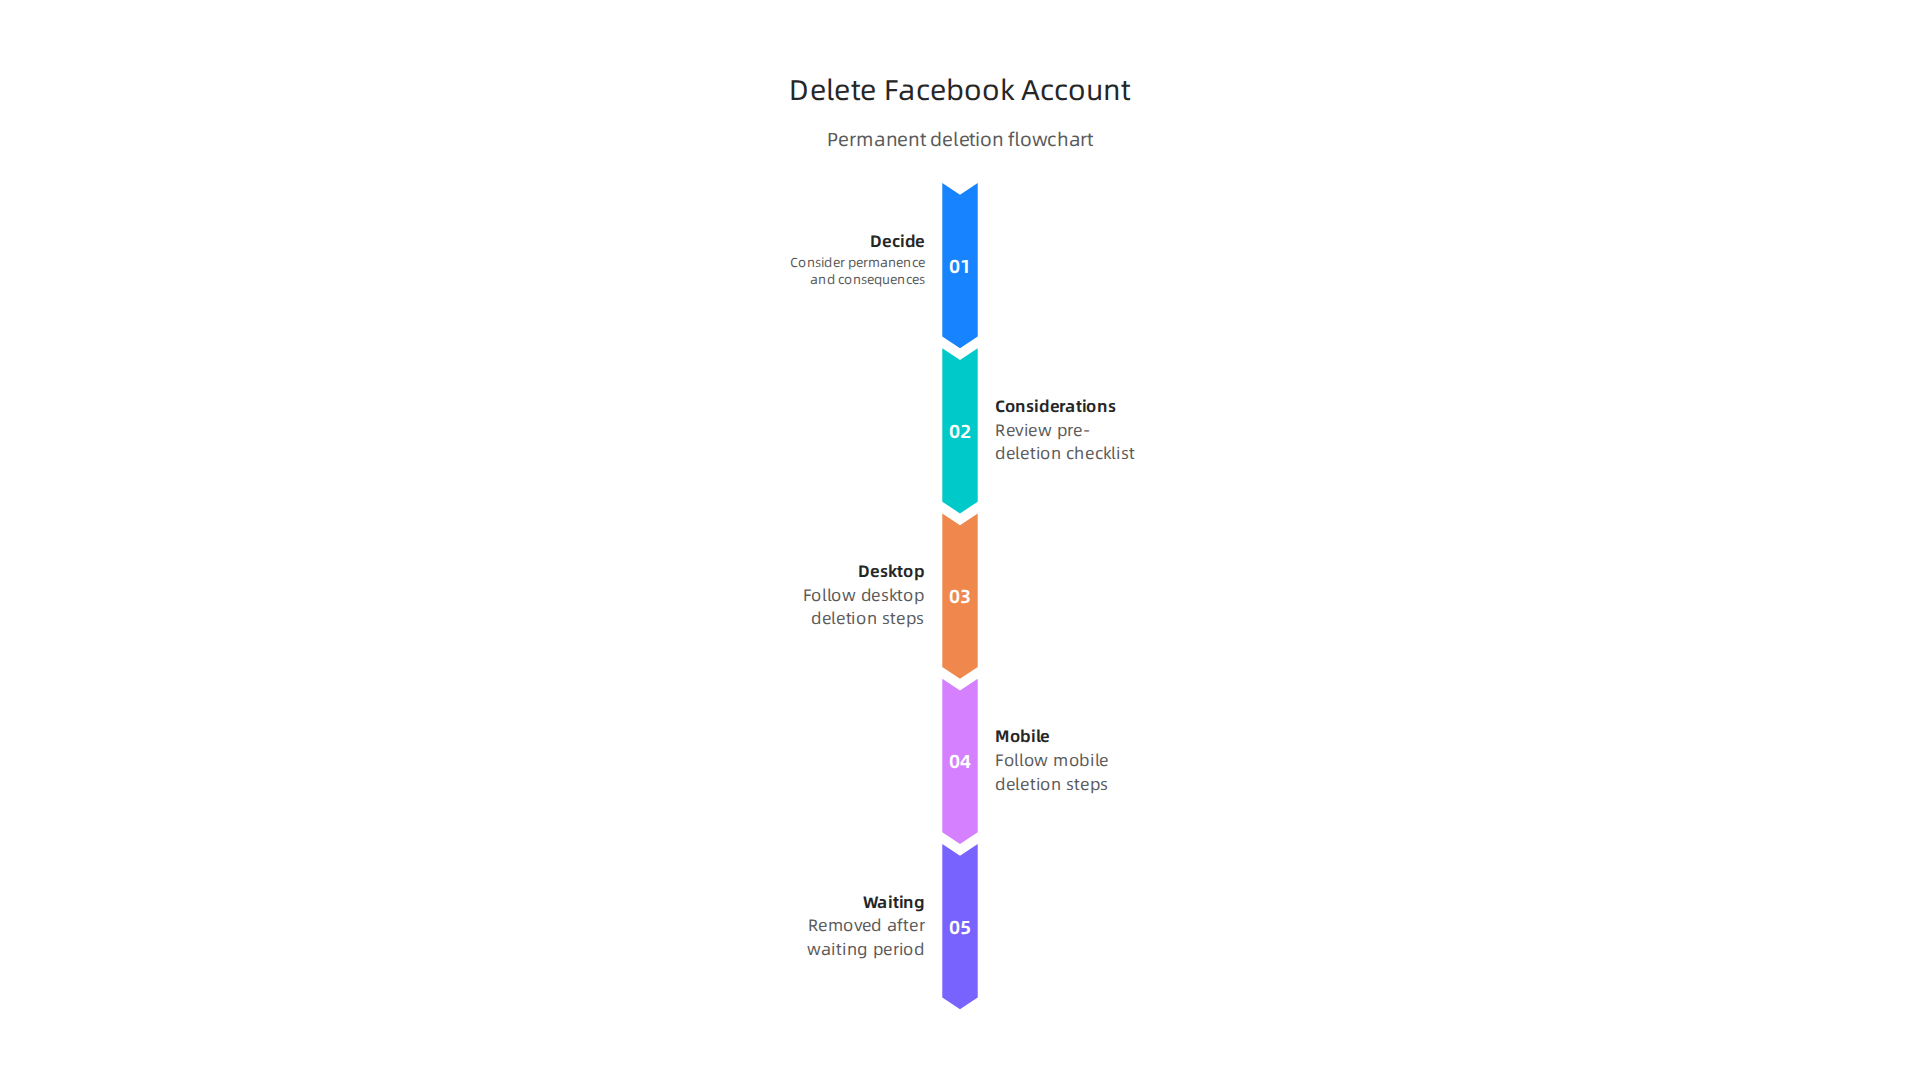
So, let’s talk about how to delete your Facebook account permanently in 2026.
Important Things to Do Before You Delete
Before you decide to permanently delete your Facebook account, there are a few important things to think about:
- Save Your Memories: Do you have photos, videos, or posts you want to keep? Facebook lets you download all your information. You can get a copy of your data before your account is gone forever [^1].
- Check Your Facebook Pages: If you manage any Facebook Pages, like for a business or a group, you need to either give someone else admin control or delete those pages too. If you don’t, your pages might be left without anyone in charge after your personal profile is gone. Learning how to delete Facebook business page is a separate step if you created one.
How to Delete Your Facebook Account on a Desktop Computer
Follow these steps on your computer to permanently remove your Facebook account:
- Log In: Go to Facebook.com and sign into your account.
- Go to Settings: Click on your profile picture or the small arrow at the top right. From the menu, pick "Settings & privacy," then "Settings."
- Find Account Center: Look for "Account Center" at the very top of the left menu. If you see it, click there. If not, look for "Privacy" or "Your Facebook Information" on the left.
- Choose Account Ownership: In Account Center, click on "Personal details," then "Account ownership and control." If you are not in Account Center, look for "Deactivation and deletion" under "Your Facebook Information" directly.
- Select Deletion: Click on "Deactivation and deletion." Make sure you choose "Delete account" this time, not "Deactivate account." Deactivating is just a pause, but deleting is forever.
- Continue to Deletion: Facebook will ask you to confirm. You might need to enter your password. They will also ask if you want to download your information one last time.
- Confirm Permanent Deletion: Click "Delete Account" to finish. For a detailed video guide, you can watch how to delete your Facebook account on desktop [^2].
How to Delete Your Facebook Account on a Mobile Device (Phone or Tablet)
The steps are pretty similar whether you use an iPhone or an Android phone to delete your account:
- Open the App: Start the Facebook app on your phone.
- Go to Menu: Tap the menu icon. This often looks like three lines or your profile picture. It’s usually at the bottom right on iPhones or the top right on Androids.
- Access Settings: Scroll down and tap on "Settings & privacy," then tap "Settings."
- Find Account Center: Look for "Account Center" at the top. Tap it. If you don’t see Account Center, scroll down further in "Settings" to find "Personal details" under "Account."
- Choose Account Ownership: In Account Center, tap "Personal details," then "Account ownership and control." Or, if you’re not in Account Center, look for "Deactivation and deletion" directly.
- Select Deletion: Tap "Deactivation and deletion." Then pick your Facebook profile if you have more than one. Make sure you choose "Delete account" (not "Deactivate account").
- Complete Steps: Follow what the screen tells you. You will need to enter your password and click to confirm the permanent deletion. A quick video can show you how do I delete my Facebook account on mobile [^3].
What Happens After You Ask to Delete?
Once you request to delete your Facebook account, it doesn’t disappear right away. Facebook usually gives you about 30 days. If you log back into your account during these 30 days, your deletion request will be canceled. After the 30 days, your account and all your information are permanently deleted. It can take up to 90 days for all your content to be fully removed from Facebook’s systems [^4]. So, make sure you’re truly ready to say goodbye.
When you decide to permanently delete your Facebook account, one of the most important things to do first is save all your memories. Think of all the photos, videos, and messages you’ve shared over the years.

Facebook lets you download a copy of all your information, so you don’t lose these precious digital items forever. This is a key step before you actually start to delete your Facebook account.
How to Download Your Facebook Data Before Deleting (and What to Look For)
Facebook has a special tool called "Download Your Information." It’s like packing a digital suitcase of your past. Here’s how to use it:
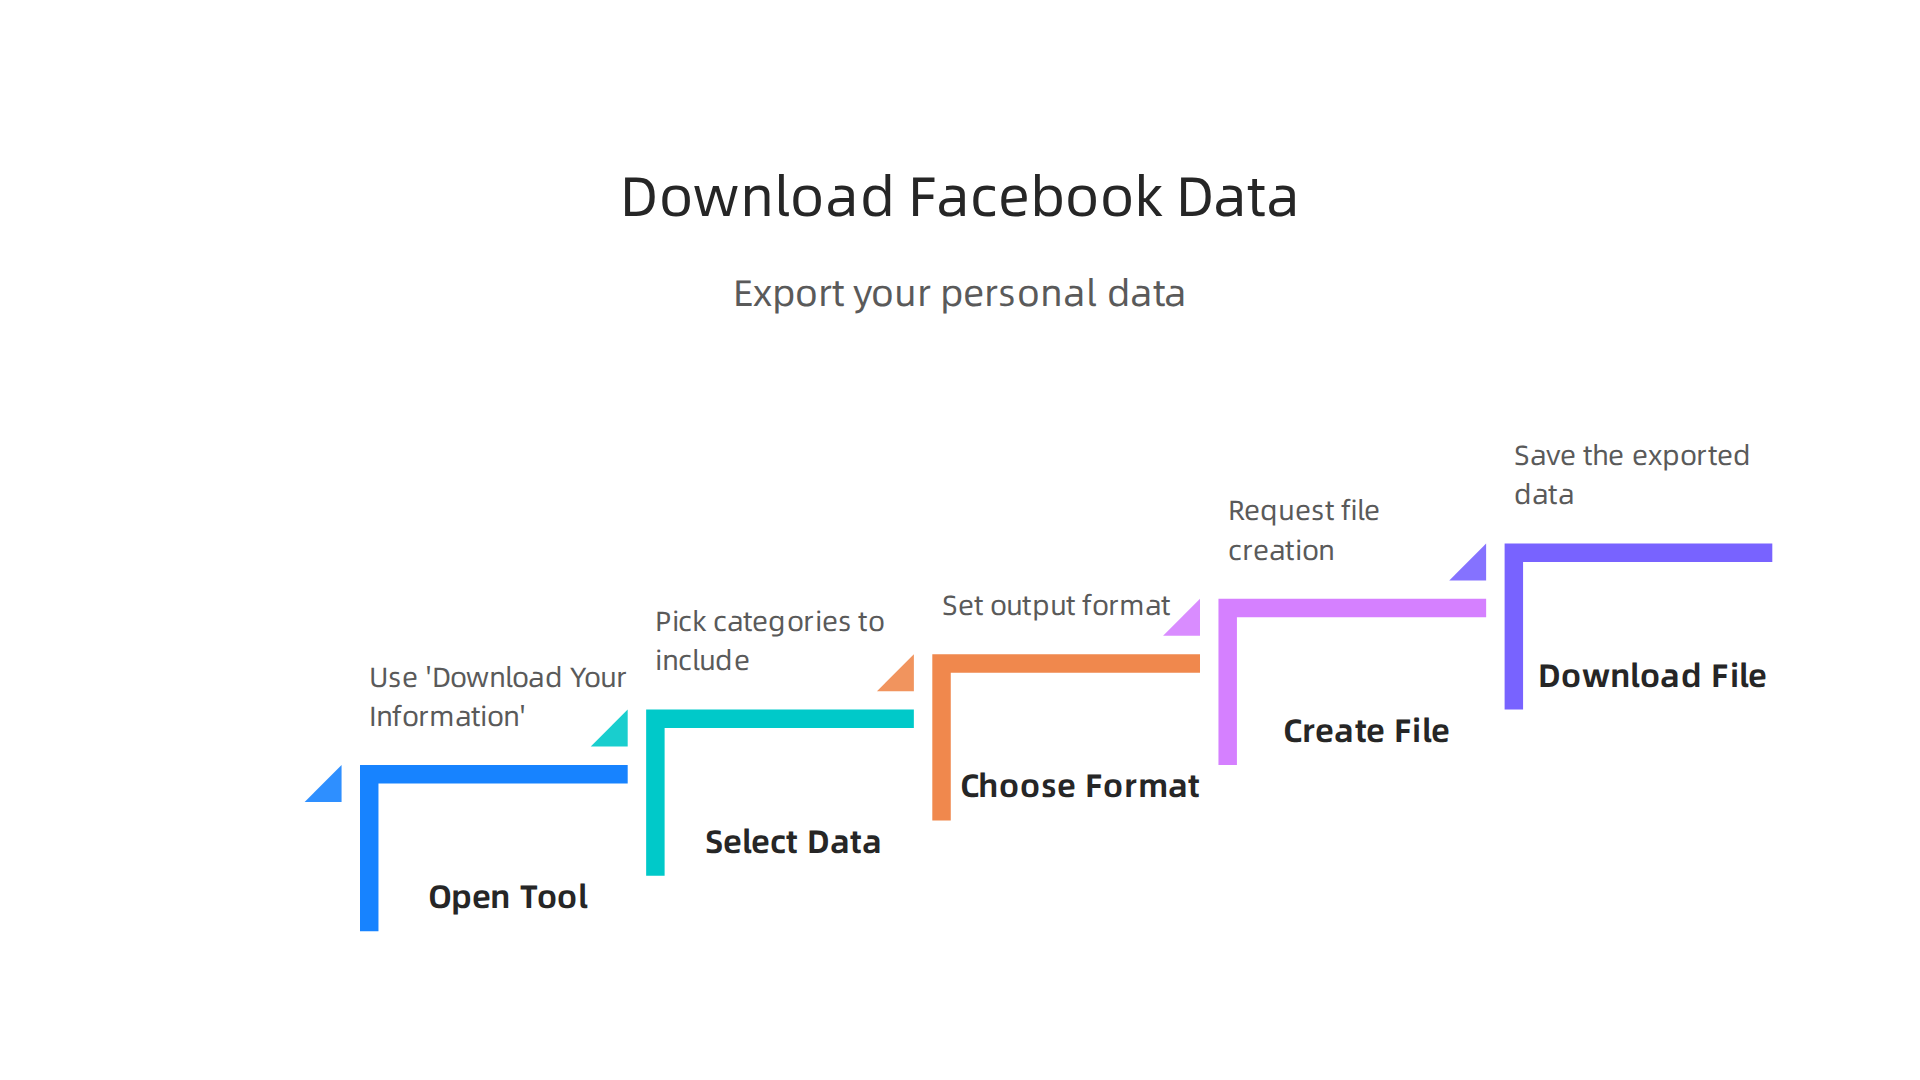
- Go to Settings: First, log into your Facebook account on a computer. Click your profile picture or the small arrow at the top right, then choose "Settings & privacy," and finally "Settings."
- Find Your Information: On the left side, look for "Your Facebook Information." Click on it.
- Choose "Download Your Information": You’ll see an option like "Download Your Information" or "Transfer a Copy of Your Information." Pick "Download Your Information." Facebook even has a video guide if you want to see how to export your data [^1].
- Select Your Data: This is where you pick what you want to save. Facebook lets you choose different types of data, such as:
- Posts: All the things you’ve written.
- Photos and Videos: Every picture and video you’ve ever uploaded.
- Comments: All your comments on posts.
- Messages: Your private conversations with friends.
- Friends: A list of all your friends.
- Reactions: All your likes, loves, and other reactions.
You can click the boxes next to each type to choose what to include.
- Pick Your Settings: You’ll also get to choose:
- Date Range: Do you want all your data, or just from certain years? For example, you might only want photos from 2020 to 2026.
- Format: You can choose between HTML (which is easy to look at in your web browser) or JSON (which is better if you want to move your data to another service). HTML is usually best for most people.
- Media Quality: You can choose if you want your photos and videos in high, medium, or low quality. Higher quality means a bigger file.
- Create File: After you’ve made your choices, click "Create File." Facebook will then get your data ready. This can take a while, especially if you have a lot of stuff. You’ll get a notification when your file is ready to download.
What to Prioritize:
Most people want to save their photos, videos, and messages. These are often the most personal and irreplaceable items. Your login history and information about apps you used might be less important, but it’s good to check everything.
Export Size and How It Looks:
If you’ve been on Facebook for many years, your data file can be very large. It will download as a zipped file. Inside, you’ll find folders for different types of data, like "Photos" or "Messages," which helps keep everything organized.
Storing Your Data:
Once you download your data, save it somewhere safe. You could put it on an external hard drive, a USB stick, or in a cloud storage service. Just make sure it’s somewhere you won’t accidentally delete it! This way, even after you delete your Facebook account, your memories are still safe with you.
Troubleshooting: Common Issues When Trying to Delete or Deactivate
Trying to delete or deactivate your Facebook account should be easy, but sometimes things don’t go as planned. You might run into a few common problems. Don’t worry, we can help you figure them out.
Login Troubles
The first step to deleting your Facebook account is logging in. But what if you can’t?
- Forgot Password: This is a common one. Facebook lets you reset your password using your email or phone number. Just click "Forgot password?" on the login page.
- Two-Factor Authentication Issues: If you use two-factor authentication, it adds an extra layer of security. If you lose your phone or access to your code generator, you might get stuck. Facebook usually provides recovery codes when you set this up. Look for those, or use other recovery methods Facebook offers to get back into your account.
Problems with Linked Apps or Admin Roles
Sometimes, other things connected to your Facebook account can stop you from deleting it.
- Managing a Facebook Page or Business Manager: If you’re the only admin for a Facebook Page or a Facebook Business Page, you can’t delete your personal account until you either transfer ownership to someone else or delete the page first. This is important if you want to delete your Facebook business page.
- Linked Apps: You might have given permission for other apps and websites to use your Facebook login. Sometimes these connections can cause problems. It’s a good idea to remove these apps from your Facebook settings before you try to delete your account.
When the Platform Shows Errors
You’ve followed all the steps to delete your Facebook account, but then you see an error message. What do you do?
- Connection Problems: First, check your internet connection. Sometimes a shaky internet can mess things up.
- Try Again Later: If the error continues, wait a little while and try the deletion process again. Sometimes Facebook’s systems are just busy.
- Confirm Deletion Request: When you choose to delete your account, Facebook gives you a grace period, usually 30 days, before it’s permanently gone. During this time, your account is just "deactivated" and can be brought back. You can check your account status during this waiting period to make sure the request went through properly. If you want to delete your Facebook account permanently, make sure you don’t log back in during this time. Remember that deactivating your account is different from deleting it; deactivation is temporary, while deleting is permanent after the grace period ends. You can learn more about how to deactivate your Facebook account in 2026 through helpful guides if you’re not ready to completely remove it yet [^2]. If you’re trying to figure out how do I delete my Facebook account, Security.org offers good insights into the full process [^1].
You’ve done the hard work of figuring out how to delete your Facebook account. Now, what really happens after you click that final button?

It’s good to know what to expect with timelines, your data, and if you can change your mind.
When you first ask Facebook to delete your account, it doesn’t vanish right away. There’s a short waiting period. Facebook usually gives you about 30 days to change your mind. During these 30 days, your account is just "deactivated" and you can log back in to cancel the deletion request [^1]. If you do log in during this time, your deletion request will be stopped, and your account will be active again. Think of it like a safety net! This is different from figuring out how to disable Facebook account temporarily, which you can do if you’re not ready for a permanent step.
After the 30-day grace period, Facebook starts to permanently remove your account and all your stuff. This process can take a little longer. While your profile won’t be visible to others anymore, Facebook needs time to clear all your data from its backup systems. This can take up to 90 days or more.
What happens to your photos, posts, and messages?
- Your Profile Content: All your pictures, videos, and posts you shared on your own profile are typically removed. No one else can see them.
- Messages You Sent: Here’s a key thing to remember. Messages you sent to friends might still show up in their inboxes. This is because they have a copy of the message.
- Apps and Websites: Any apps or websites you linked to your Facebook account will lose their connection. It’s always best to remove these connections before you start the deletion process, as we talked about earlier.
When we talk about privacy, you might wonder if Facebook keeps any of your data forever. For important reasons like law enforcement, fraud prevention, or legal rules, Facebook might keep some records even after your account is deleted. This is standard practice for many online services. However, this kept data is usually not tied to your name anymore and is only for internal uses, not public.
To be extra sure about your information, remember to download your data before you try to delete your Facebook account. This way, you’ll have your own copy of everything you’ve shared over the years. If you also manage a Facebook Business Page, remember to transfer its ownership or delete Facebook Page first if you don’t want it connected to a different admin. You can learn more about how to delete your Facebook account permanently in 2026 in various helpful guides [^2].
Summary
This guide explains how to deactivate or permanently delete your Facebook account in 2026, why the choice matters for privacy, and exactly what to do on both desktop and mobile. It walks you through step‑by‑step actions for pausing your account (deactivation) or removing it forever (deletion), including how to download your photos, messages, and other data first. The article also covers important practical issues—what happens to Messenger, Facebook Pages and groups, and apps that use Facebook login—and how to transfer page admin or remove connected apps. You’ll learn the timelines to expect (a ~30‑day cancel window and up to 90 days for full removal), common troubleshooting tips for login or admin problems, and simple checks to make sure you don’t lose access to business pages or memories you want to keep. Read this to leave Facebook intentionally and avoid common mistakes before you hit delete.